
As I was preparing for my apprenticeship in Japan, there was some big decisions to be made. I had about 15 or so Bonsai trees and nowhere to keep them during my absence. I had to make the tough decision to sell most of them and ended up keeping only 4 trees. Boon Manakitivipart was kind enough to keep those four trees for me while I was away. As I worked at Aichien, I’ve often though about the trees I’ve kept, reminiscing how great it’s going to be when I can get back and work on them again. Months past and soon years and the memories of the trees faded deeper in the back of my mind.
Having come back home only two months ago (so much has happened since!), I see the trees right in front of me and it’s time to continue where I left off. In this post I will be sharing the continued story of one of those trees that I left. Now that we are reunited again, I look forward to our continued journey together.
A Bit of History
 January 2011
I purchased this tree in 2009 and it actually had quite a bit of branching on it. Not so much looking at the above picture though. I decided to keep this tree because it’s one of the biggest Trident Maples I’ve seen. It has decent taper and a pretty good root spread (buried in the soil). One of the things that bugged me about this tree was that all the branches were too skinny. Especially the lower branches. Since I’m going to be away for a while, I thought it would be a good idea to repot the tree into this large 24in x 24in (61cm x 61cm) box, cut off many of the branches back and allow new branches to run so that it can thicken the main branches. The height of the tree is 26 (66cm) inches and the root spread is 15 inches (38cm).
Well, not much to look at after the cut of 2011. It’s okay though because little did I know, I would be receiving a massive dose of deciduous tree training in the coming years at Aichien. See you in five years tree! …or so I though…
August 2013
 August 2013
Two and a half years past and I’m back in California carrying this heavy Trident Maple again! Well, it looks like the tree grew some! I talked to Boon about its growth and he said he cut some of the branches back at one point because the branches were so long and taking up too much bench space! Importantly though, he kept the main runners to keep thickening those skinny main branches.
 Since the tree was so bushy, I started cutting off the leaves so I can see the branches I have to work with. Summer is the time of year where the majority of deciduous tree work is done.
The Four Sides
 Front
Front
 Tree’s left
 Back
Back
 Tree’s right.
Since the tree is so bushy, it’s a bit deceiving and we tend to make the assumption that there are lots of branches. This is the main reason deciduous trees are best shown without the leaves so that we can see the branch structure. Leaves can hide many faults.
 After a few hours of leaf cutting, here is what the tree looks like. Surprise! not that many branches, but definitely more than 2011.
 Sorry about the blurry picture. This branch is my main branch and it has bulked up some. Note the center runner branch on the bottom right? The main branch is still not big enough so I’m going to let the branch continue to run. Ideally, I’d like to see this branch about twice its current size.
The Four Sides without the leaves (after some cutting)
 Front
Front
 Tree’s right
 Tree’s back
 Tree’s left
Because of time constraints, I quickly went through the tree and cut some branches back. The ones that are left with long shoots are the branches I want to thicken. At the end of the blog, I will put a couple of links to past Trident post about how I cut branches back.
 Here is one of the branches that I have let run. Note how it has divided into multiple branches. If I allow these branches to grow, the thickening process of the base of the main branch will actually slow down. So what to do?
 I went through these branches and cut off all the competition and kept only the center branch. By doing this, the terminal branch will grow faster and quicken the thickening of its base.
Developing Deciduous Trees and Cutting
So lots of branches were cut back and the tree doesn’t look like much at this point. Developing deciduous trees can be very different than developing conifers/evergreens. It requires much more growing and cutting than other trees. Once the branches are thick, they can’t be bent or moved around anymore. If there are undesirable branches, they are usually cut off and new branches are grown in it’s place. Then the branches are grown long to thicken and then the branch is cut back leaving just a small piece of it. That process is then repeated over and over for years. On top of that, if we accidentally let something grow too long or don’t make the necessary cuts at the appropriate time, we can lose years or work and would have to take several steps back just to move forward again in the development.
Overall, the techniques aren’t difficult but it does require a lot of time and doing the techniques at the right time.
Long Term Plan
Having said all that (there’s more), that’s why we don’t see deciduous trees used as demonstration trees. The plan is so long term that we have a hard time seeing the future.
It’s all in the plan. Unlike junipers where things can be moved around with various techniques, the plan in its development can be fairly quick in terms of years. A medium size juniper can be developed to look fairly nice in 5 years. Whereas a medium size deciduous tree can take 15+ years before it looks nice. That’s assuming that we’re happy with the trunk size. How long do you think it’s going to take to develop this huge Trident? So the work on deciduous vs. conifer/evergreens can be deceiving (especially the initial work) because we have a tendency to see trees being developed in a relatively short period of time. After a juniper demonstration, we usually can see the tree shape forming. Not so much on a deciduous tree…
Age
Some of the nice features of a Trident Maple only shows up with age. Their bark starts to peel revealing an orange pattern. The trunk starts to look more muscular and bumpy as well. Lets looks at some of the signs of age on this tree.
 Here is an example of the bark peeling. Normally when I work on Trident Maples, I’ll take a scraper and peel to loose bark off. In a couple of weeks, the bright orange color will dull out and blend together with the grey bark.
 This was a cut I made about four years ago. Within a year, the cut closed completely but was a bright orange color. It’s good to see that it’s starting to match the trunk color and blend in.
 This scar was there when I first got the tree. Now it’s starting to look like just another muscular bump on the tree.
The fact that the bark is separating from the tree, tells me that the tree has slightly gotten bigger than before. Nice!
Old Air-layer
 One of the interesting stories about this tree is that the former apex of the tree is sitting in this pot pictured above! The old apex of the tree had terrible reverse taper so Boon decided to air-layer the top off about 5 or 6 years ago and make a small clump style Trident maple.
 Here is the point the air-layer was removed. It’s all healed up and looks more like the trunk than an old scar. Wouldn’t it be great if both trees were shown together in a future exhibition?
A Hole to Fill
On the back of the tree, there is a fairly large scar. It looks like a large branch was removed years ago. I was able to close about an inch surrounding the scar and I had re-dressed the scar to continue the callus process before I left for Japan. Lets see how it’s doing.
 Here’s the big scar and the cut paste I applied years ago. I noticed that there is a small hole in it…
 After removing the old cut paste, I had found that the wood underneath had started to rot! That’s not good. Look how far my tweezers were able to go into the hole.
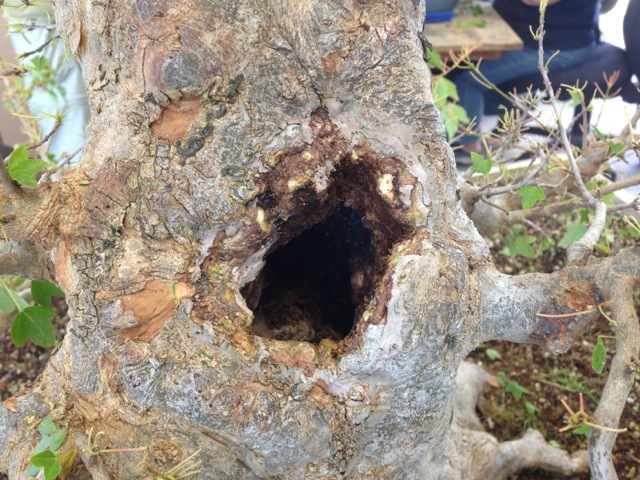 After digging out most of the rotted wood, I am now left with a huge hold in the back. Since I’m not looking to show a scar on the trunk, I need to take action and fix this problem. Trees in general only callus on hard surfaces such as dry wood. In this case, there’s no more surface for the callus to grow on and connect. In cases like this, a new surface needs to be put in place.
 Ta-da! Instant cement! There are lots of different types out there and can be easily found at the local hardware store. Just add water and we’re ready to go. When mixing the cement, I like the consistency to be thick and not too watery. This way, it’s much easier to mold it into place.
 Once I got the mix ready, we spooned in the cement.
 Here’s the hole filled with cement! Depending on the type of cement, drying times vary. In this case, It was going to take at least 5 hours for the cement to dry and harden. As the cement started to dry, I went through and cleaned the edges up a little.
 Here’s what the cement looked like about four days later. I tapped it with my fingers and its very firm.
 Now that the cement is dry, I took a carving tool and cut into the edge of the surrounding callus. By doing this, I will cause the callus to reactivate and continue to form.
 Once I exposed the live tissue around the callus, I applied a liberal amount of cut paste.
 Hey, that looks like chocolate! Lets see what happens in the next couple of years. My goal is to get this wound to heal completely shut.
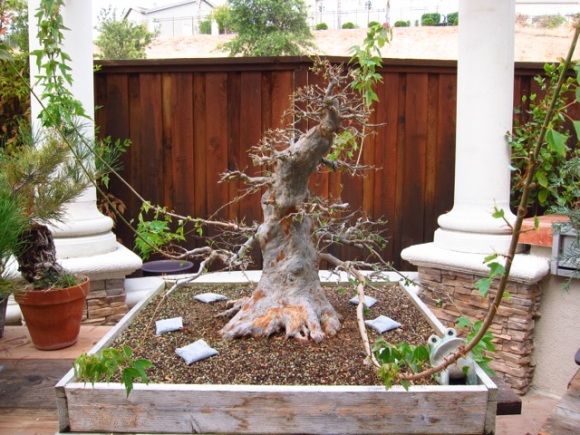 Here is a photo of the tree at my backyard. It’s great to have my trees back home!
The Future
Now that the work is done on this tree, I’m going to leave it alone for the rest of the year. I applied light fertilizer on the soil and will moderately feed 5-5-5 organic till Winter. Once Winter arrives, I will remove all the leaves again and do some light pruning. In about February of 2014, I will take the tree out of the box and put it in a bonsai pot. I’ll be sure to update you all and show the progression of this tree. This tree and I are in it for the long haul and I expect to be developing it for the next 10+ years.
 My goal for the Trident Maple is to develop the structure like this great Trident that my teacher Mr. Tanaka owns. Hopefully in the future I will be able to have a photo of me next to my fully developed Trident Maple just like Mr. Tanaka.
Thanks for reading.
——————————————————————————————————————————–
For those that enjoyed this post and would like to read more about Trident Maples, please click on the links below to some older post that I have written.
- November 12, 2012 – #2 Trident Maple Project (cont) – In this post I update the readers on a Trident maple and the results of Summer defoliating and cut back.
- October 24, 2012 – Root Over Rock Trident Maple Project (con’t) – In this post I talk about Trident Maple cut back and initial styling.
- August 14, 2012 – “Good Taste,” Trident Maple – In this post I share photos of a small yet old and unique Trident Maple.
- June 12, 2012 – The Trident Maple Project and Summer Maple Work – In this post I talk about basic Trident Maple work during the Summer on one of my project trees.
- April 22, 2012 – The Trident Maple Projects (yes, another two…) – In this post I talk about the initial start of two Trident Maple projects.
- April 7, 2012 – Restarting a Trident Maple – In this post I talk about how I prepare a Trident Maple for a major restart.
- December 24, 2011 – The Strange Trident Maple – In this post I share photos of a very unique and established Trident Maple Bonsai.
- September 11, 2011 – The Trident Maple Hustle – In this post, I talk about how I tackle the initial work of many root over rock Trident Maples.
———————————————————————————————————————————-
August 24-25, 2013
If you are around on August 24th or 25th, please be sure to attend the Redwood Empire Bonsai Society Annual show. It is one of the biggest shows in California and they have a huge vendor area as well. Here is a link to their site:

Yours truly will be there and I will be selling quality Bonsai ceramics. I will be brining over 50+ different pots of various quality for you to see, feel and perhaps take home! Types of ceramics range from Antique (over 100 years) to modern, both Chinese and Japanese.
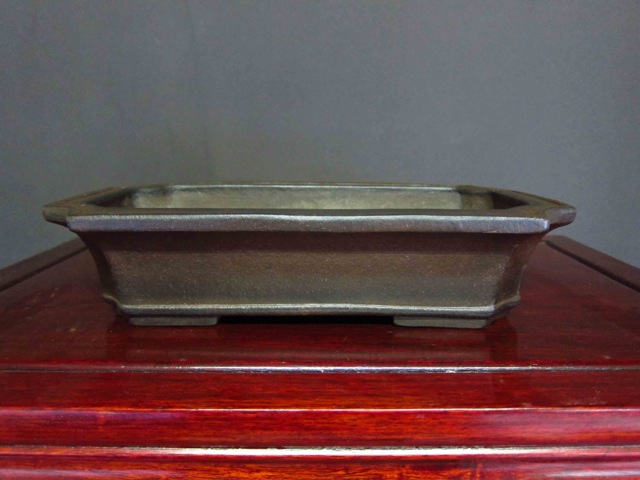
Here are some examples of some of the ones I will have at the show.
 Chinese Antique (100-150 years old)
 Japanese Antique (100 years) drum pot
 Yamaaki signature pot (30 years old)
 Chinese Antique (100-150 years old) Namako glaze
 Japanese Antique (100 years old)
 Shosen, first generation Yamaaki (50+ years old)
 Japanese Antique (100 years old)
 Japanese yellow glazed shohin pot, hand-made (30 years old)
Hope to see you all at the show!
If you are actively reading this blog, I would appreciate it if you subscribe to it (The subscribe button is below). This is one of the best ways for me to know how many people are reading. Thanks!

I enjoy your many talents and “Thank You” for sharing! May I ask, what is the best tool for carving out rotten wood? Do you go slightly into the interior part of the trunk to stimulate growth back?
Thank you for exellent articles and your knowledge
great post
Great post, Peter!
I especially enjoyed the instant cement idea I never thought to look for that.
Hi!! Peter ,
Do you still have workshops scheduled ?
Regards
Paul Dominic
________________________________
Reblogged this on Lyons Bonsai and commented:
Great Read.
Reblogged this on DangerousBry's Blog and commented:
This is a fantastic report on the development of a tree 🙂
Hi Peter, Wow great Blog!! I have Never seen the cement technique used? What great material to work on that is going to be a beautiful specimen. Wonderful information thanks and keep them coming!!
[…] trouble to search them out. But we’ll make an exception in this case because it’s from Peter Tea’s excellent blog which has long been a source of great material for us. Here’s what Peter has to say about the […]
Excellent and useful post for us buerger fans!
Hi Peter.
Welcome back! Nice trident. Isn’t that a hornebeam pictured with Mr. Tanaka? It’s an
Unuasual tree and I seem to recall that it’s a hornebeam, not a trident, but I am probably wrong.
What’s the price range on that 1st generation Yamaaki? I love signature Yamaaki’s.
I hope you make it to the GSBF convention in Burbank this October.
Elliott
Elliott, i think you best read this post…
best
David
David
See? I was rite! I said I was probably wrong about it being a hornebeame and I WAS wrong! LOL!
Thanks!
Elliott
just helping you out with some information 😉
This maple also happens to be at the moment on Bonsai Bark
bonsaibark.com
Reblogged this on Kitora no do.
Mr. Tea~ Welcome back to California! After reading this post I read all the posts on “#2 Trident Maple Project.” An impression I’m left with is that it is ideal to develop the trunk first, not worrying too much about primary and secondary (etc) branches. Then develop the primary branching, and finally all the little ramification branchlets. Is this correct in a general, “big picture” way?
See you in Santa Rosa.
Morgan
Hi Peter,
Great to follow again a trident maple post. I miss the progression from the projects you started in Japan :-).
Isn’t the ‘instant cement’ bad for the tree? I can imagine there are chemicals in cement. Or do they use that also in Japan to fill big holes?
Anyway, always interesting to read your posts. Always something to look forward to :-).
Tx!
Very cool. I have a Trident that some leaf tips are burning. Any idea what causes that?
Seems to be watered well. It has been very hot here in Dallas.
Mr. Tea(I like that)
Such a great blog. Glad you will be more a regular contributor now that you are home. I have a trident that is still in my garden. Using the Peter Waren style of screwing a piece of plywood to the bottom I have just left it in the garden to go cookooo. Would I be better off to put in your 24+ 24 box or just leave it in the garden. I have good access to the tree so I can manage the growth without digging it out, or should I box it for a more controlled environment . Woud appreciate very much someone’s response .
Qualicum Brian
Barb, this is ESPECIALLY for you. pk
I have always been curious about putting filler of some kind in holes. Did you dig until live wood came out? Looking forward to Oct workshop Penny
Great post Peter! I look forward to watching this trident develop.