The Trident Maple Project and Summer Maple Work
After a long day of De-candling and pulling needles, it was good to get back to the leafy trees. The hours after dinner are considered my free time and I took that opportunity to revisit this Trident Maple Project! Normally, I would have gotten to work on this tree earlier but I decided to allow some branches to extend to strengthen the tree. After all, I did cut off a bunch of branches and repotted it a little late in the season. If you would like to read about the cut back and repotting of this tree last April, you can visit that post by clicking here. The early Summer evenings are cool now and it is a good time to get some work done. I grabbed my camera and got right to it. In this post, I am going to share how I defoliated, cut back and wired this Trident Maple. I will also talk more in-depth about the concept of defoliation and have some pictures as to how we do it here at Aichien. Lets have a look at the tree!
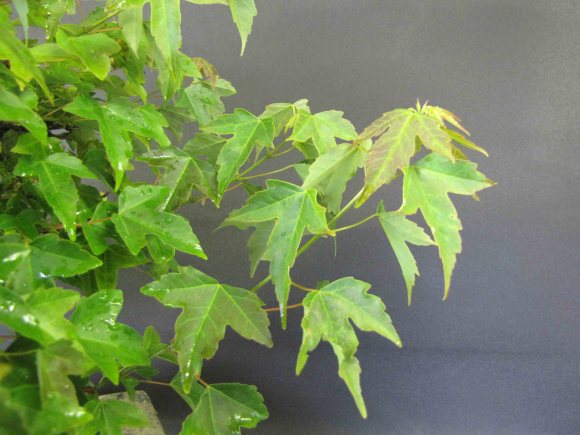 The photo above shows a long shoot that has grown from the bottom branch. Normally, when a branch is allowed to run, they get stronger and thicker. In this case, the internode started to get longer and leaves start to get bigger.
So the tree has grown quite a bit of foliage since mid April. The first thing I did was examine the tree and check the overall health. Things we look for is overall growth and vigor. Depending on the health and strength of the tree will determine is we should proceed with a specific technique. If the tree isn’t doing very well, then we would split off from normal routine work and move into health rebuilding mode. Overall, this tree is growing well and is healthy.
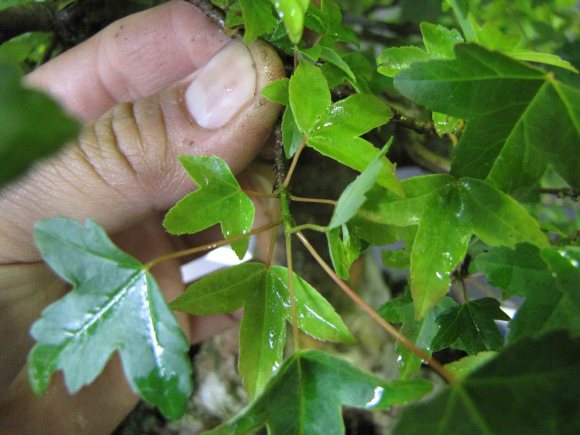 Here is an example of a healthy but slower growing branch. Internodes are short but do you see that as the branch elongated, the leaves grew bigger then the first pair?
My Goals at This Time
My goals for this tree at this point is to defoliate all the leaves and cut back any branches that are either too long, too strong, or un-needed. I also plan on wiring branches to space them apart more evenly to allow for better branch development. A couple of extra curves here and there couldn’t hurt either. I pulled out my nice sharp scissors and got right to work. Here are some of the things I did.
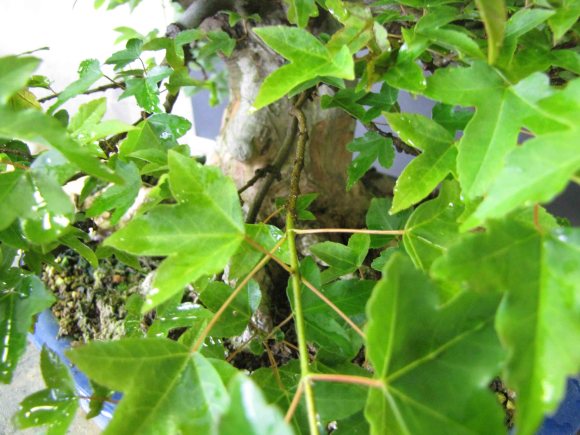 This is another example of a vigorous branch. The branch was allowed to extend so it got very strong.
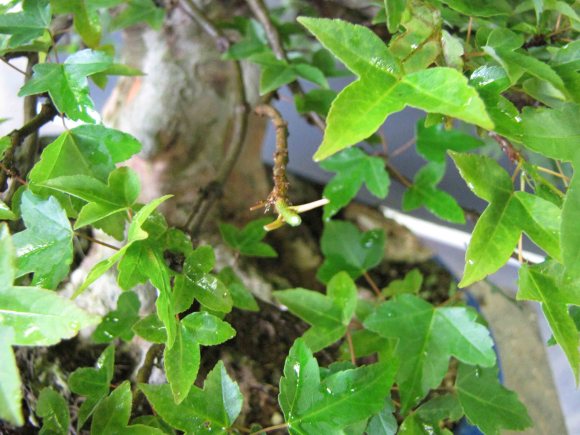 Here is the same branch cut back and defoliated. I cut the branch back to one set of new buds (one node). This will force the buds to grow two new shoots, hence giving me some division in the branch structure.
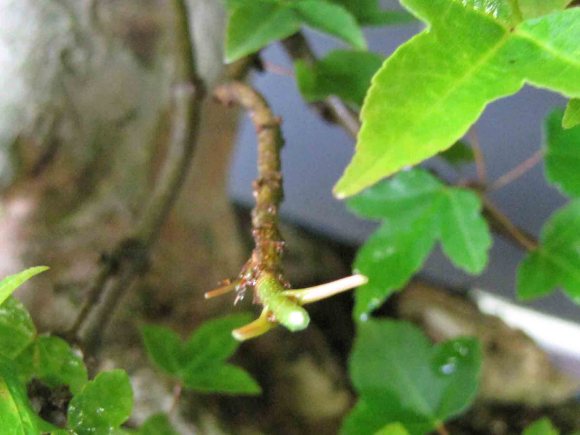 Here is that same branch zoomed in. If you look at the photo carefully, you will notice that the entire branch (old and new wood) is one long branch with many buds along it. Why not cut back more and get the branch division back further in the tree? Well, that is a great question! Right now, the tree already has many other branches that are at good lengths. If I cut this branch back deep into the tree, the old buds will bud out, but they will then be shaded by the other branches and leaves above. This could potentially cause the bud to weaken and not extend, or even die off. If I was to cut this branch back hard, I would need to cut the others as well to give all the buds enough light to grow. In this case, I cut the branch back to one new node to force the branch to back bud on the new and old buds. The leaves from the old buds, though shaded will still have a strong pull from the terminal end, keeping the branch strong and alive. Once the interior buds start to strength and extend, I will then cut back to them.
What? Not all cuts on a tree are final??? Well… yeah…
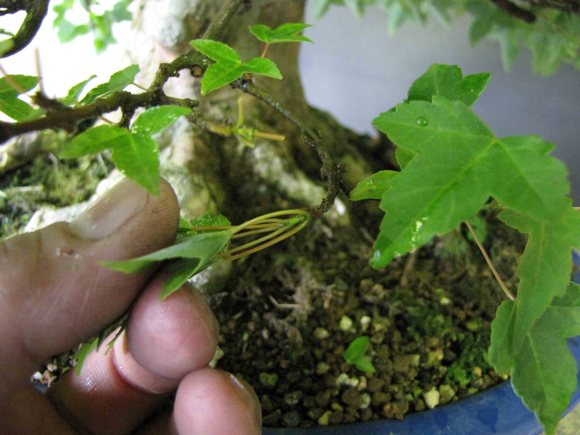 Here is an example of a weaker branch that slightly elongated. The internodes are even shorter. These leaves and extension still needs to be cut.
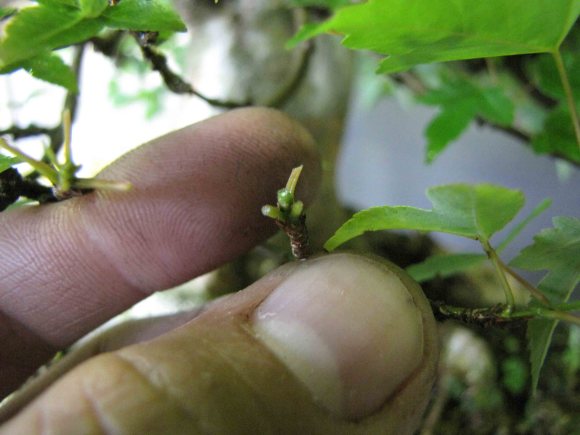 Here’s the same branch cut back to one new set of buds.
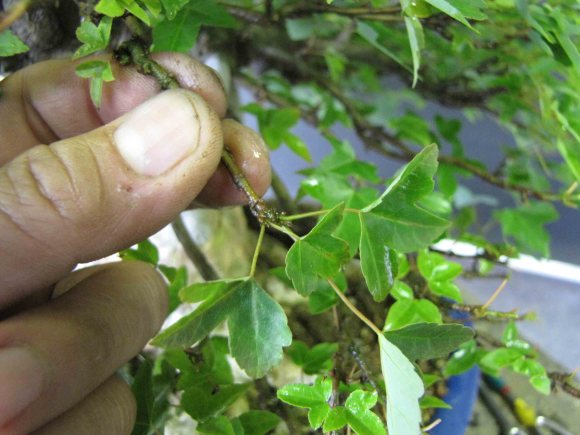 Branches like this represents the weakest parts of the tree. The buds only grew a set of leaves and didn’t elongate.
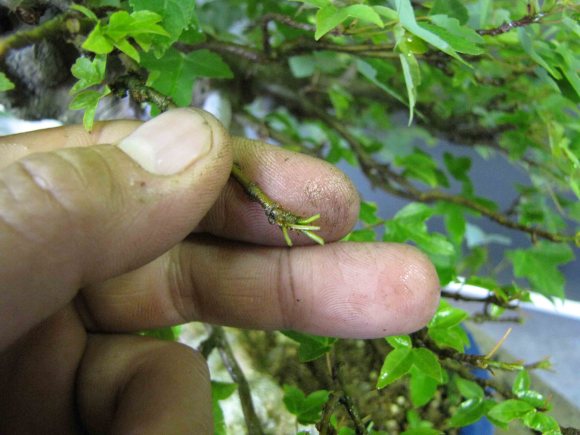 These leaves too were cut. This is an example of stressing an area of the tree and forcing new growth. If these leaves are left alone, they could just sit there till the end of the growing season. By slightly stressing it, we could potentially force the new growth to push new leaves and elongate. The tricky part is figuring out where the line between good stress and bad stress is. Since the tree overall is growing well and these leaves are on the exterior and upper portion of the tree, I decided to go for it. If I felt the area was too weak, I’d leave it alone and not defoliate the leaves.
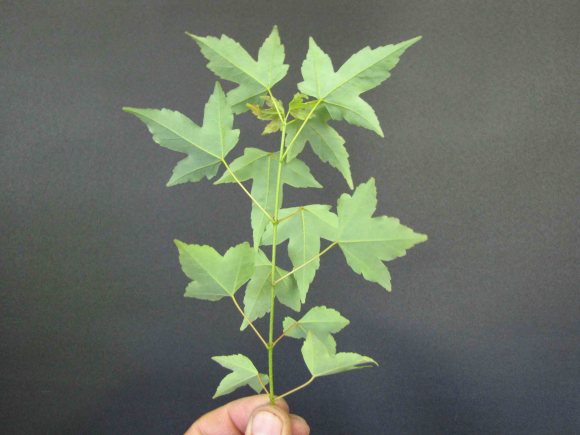 Since I’m cutting back and defoliating this tree, it doesn’t mean I become a zombie and just cut everything. Unlike zombies, we have brains whereas zombies just want to eat our brains… SINCE, this is a zombie free blog, we use our brains and adjust our technique as the tree requires. There is one branch on this tree that needs to thicken. Cutting is the last thing we want to do to that branch. We need to allow this branch to grow freely and continue to thicken. Here is a nifty technique we use to force the branch to elongate more aggressively. The photo above is an example of a branch that we need to elongate and thicken.
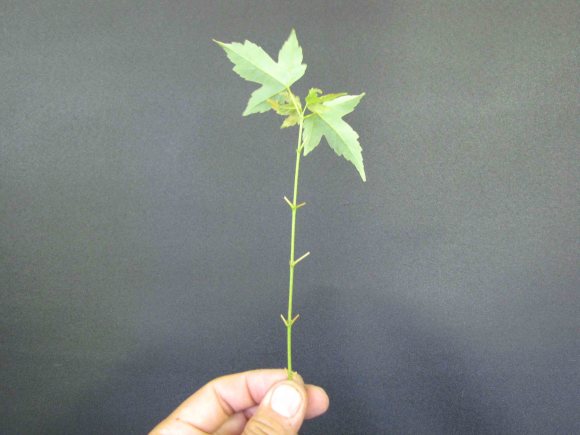 What we do is cut of all the leave long the branch and only leave the leaves at the terminal end. By doing this, it will actually force the branch to elongate faster. Why is that you say? Basically, we removed the food competition on this branch. All the energy and food is going to go directly to the terminal end instead and force it to grow faster. There will be photos of the long branch I kept, further in the post.
Haha! Anyways…
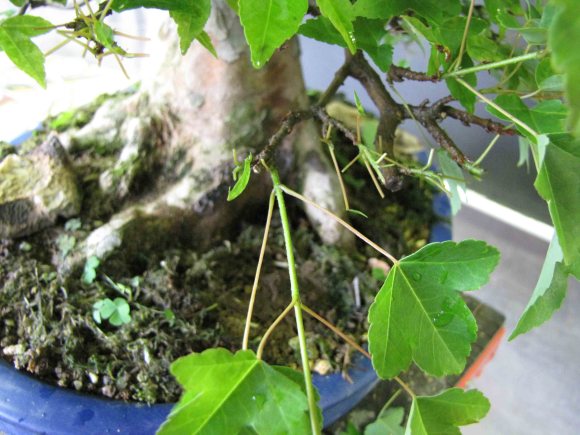 Here is an example off an area where I need a longer branch.
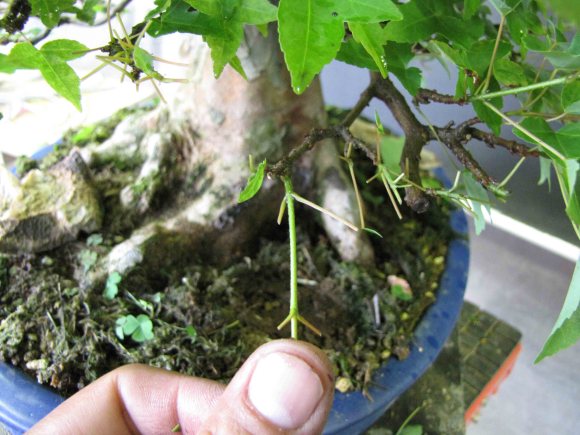 Since I want the branches on this area to extend, I would keep more than just one node. In this case I kept two. BUT!
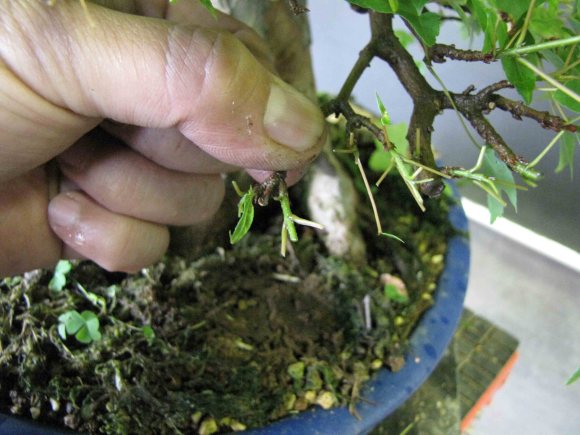 BUT! look at how long that internode is??? Though I want more length, the internode is just too long so I’m forced to cut back to one node instead. As the pair of buds grow and elongate during the Summer, hopefully I’ll get a pair of short internode branches to fill in the length I need.
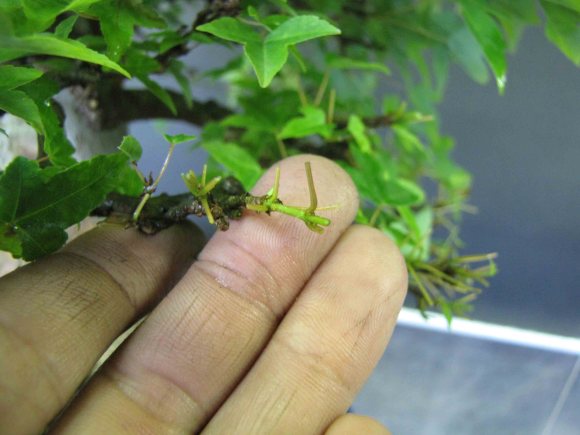 Here is another example of a branch length I need. The internode is short and useable. In this case, I kept two pairs. So why not just cut back to one node and get the desired branch length with two branches instead, like the last example? You are asking some really good questions! The reason is about taper and the ideal branch structure. Internodes on naturally growing trees get shorter as you move away from the trunk. The branches also get finer and finer as they grow away from the trunk. In this example, the branch that the new branch is growing from is thick. It would look strange to have short internodes and fine branching so soon coming from a thick branch. On the last example, the branches has already developed some taper. Though I needed some length, it was okay to achieve it with multiple small branches instead.
Tricky huh? Lots to think about when cutting.
To quote Mr. Tanaka: “If you want to make great Bonsai, you always have to be thinking.” I guess Aichien is a no zombie zone as well.
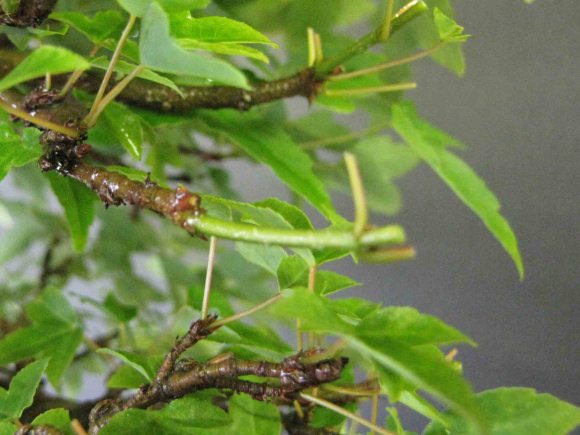 Here is an example of a long internode growing right out of the bud. If I was to keep one node, the branch would already be too long. That’s no good as well.
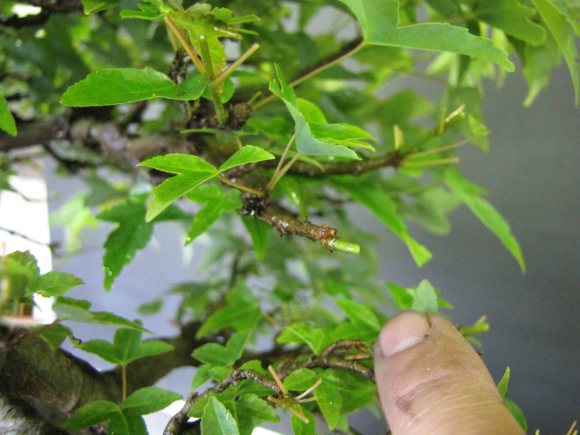 In this case, I cut off the first node and left a stub. This will cause the original bud to send out a second set of leaves. Perhaps this second set will give us more desirable internode lengths. *There is some caution in doing this though*. When the second set comes out from the original bud, that area will start to swell slightly. Performing this technique should only be done once to limit the swelling. If it’s done too many times, the area will swell into a knuckle. Usually, hobbyist that cut back or pinch incorrectly will create those swelled areas all over the tree. Once the knuckle starts to develop, they are difficult to impossible to fix, and usually need to be cut off.
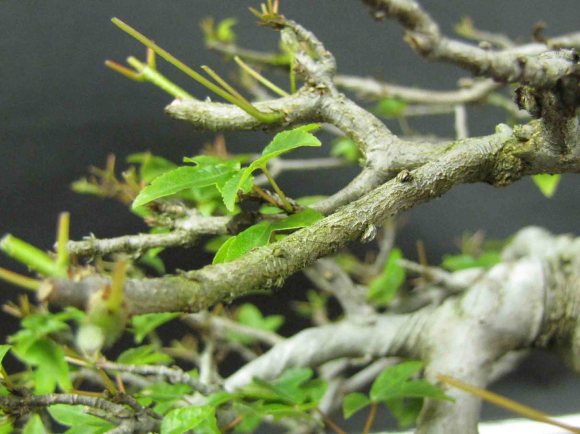 Here is an example of developing taper on the branches. This branch pictured is long and has no taper. The end of the branch(blurry part) was cut in the past and two new buds started to grow. I was hesitant to cut this branch initially in April because tree was somewhat weak. Now that I know the branch is strong, I can go ahead and cut it back harder.
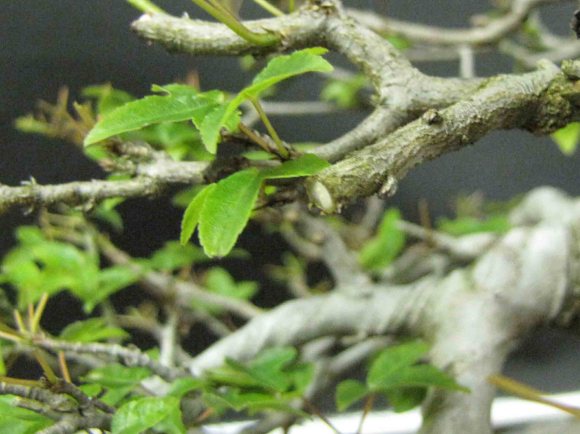 Here is the same branch cut back. Once the back buds leaf out and elongate, I can use them to develop better tapering branches. Of course I applied cut paste to the cut.
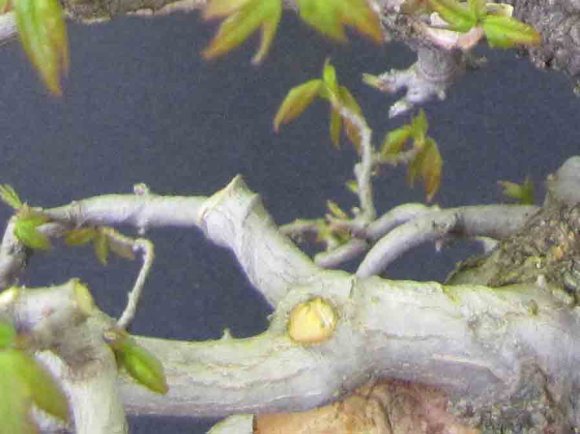 Speaking of cuts and cut paste. Here’s a shot of a cut I made last April.
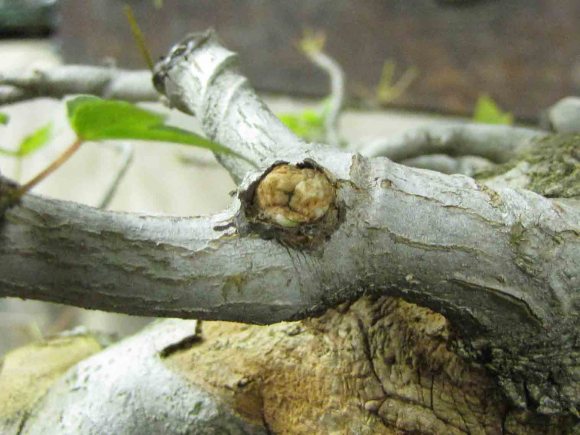 I peeled away the rubbery cut paste and found that the wound as completely callused up. That was fast! As the callus starts to harden, it will start to blend in with the branch. The cut paste I used must have really sealed the wound well because the callus was surprisingly soft, and light-colored. I believe that the callus grew fast because it didn’t have to worry about drying out and exposure to the elements. What do you think?
Callus on Trident Maples can be fairly thick and looking at the callus now, I wish I had made the original cut deeper. I may have lucked out though because older Trident Maples tend to have a more muscular feeling on the trunk and bulges here and there are normal. Perhaps this callus can be used as a feature as opposed to a fault. I guess only time will tell.
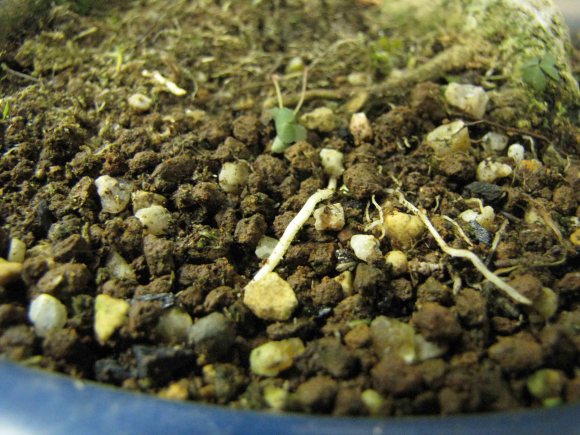 Once I finished cutting, I cleaned off the moss to find nice new tender roots growing on the soil surface. I guess nobody ever said Trident Maples grew slow. I was careful not to disturb these new roots because they can break apart easily.
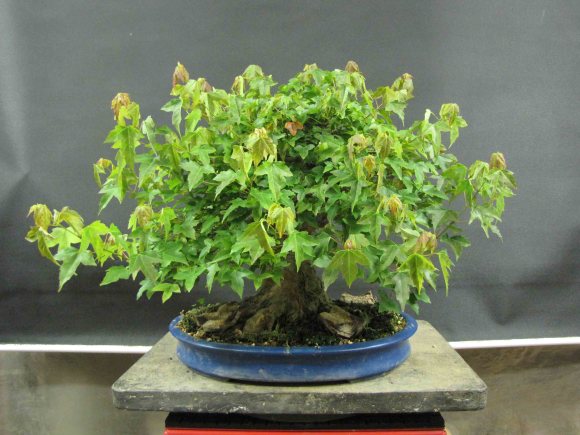
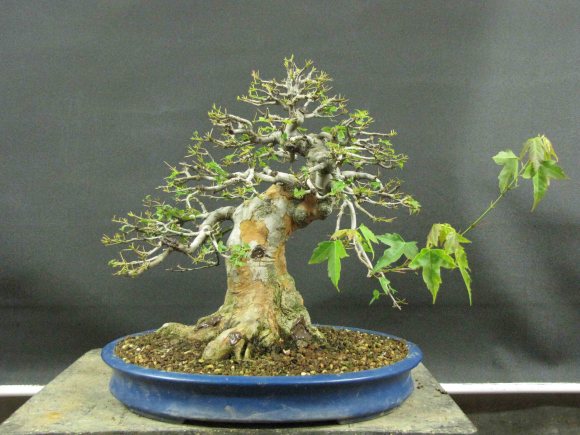 Here is the tree after the light cut back and defoliation. I mainly defoliated the exterior leaves of the tree. Leaves growing on the inside were not cut and now can become stronger from the extra sunlight available. These interior buds will be future branches used to make this tree fuller. The branch on the right is the one I’m trying to thicken.
Wiring
I’m not going to get too deep into how I wired this tree, but here are some basic things to know about wiring deciduous trees.
Aluminum wire
Normally deciduous and broad leaf evergreens are wired with aluminum wire. Reason being is that the wire is soft and the thickness of the wire helps in distributing the pressure of the wire along the surface of the branch. Deciduous and board leaf evergreens tend to have thin bark so excessive pressure will damage the branch. Also, since Aluminum wire is soft, the wire size used to bend a branch typically needs to be a 1 to 1 ratio. If the branch thickness is 2mm, then the wire will needs to be about 2mm as well.
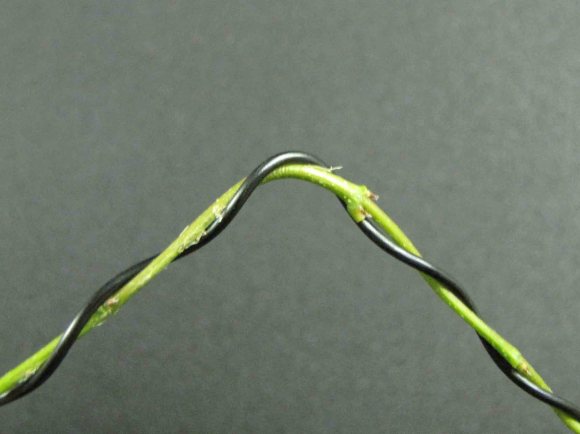 Here is an example of aluminum wire on a branch. The spiral of the wire in this example is a bit on the shallow side. Normally about 45 degrees for the spiral is good for deciduous trees. Also note that the wire isn’t sitting on top of any of the buds. Not only does the wiring need to be consistent and clean, it should avoid smashing buds or leaves. Branches on deciduous and broad leaf evergreens tend to be stiff compared to conifers so bending can be tricky. The important thing to do is to have the wire on the outside of the bend to support it.
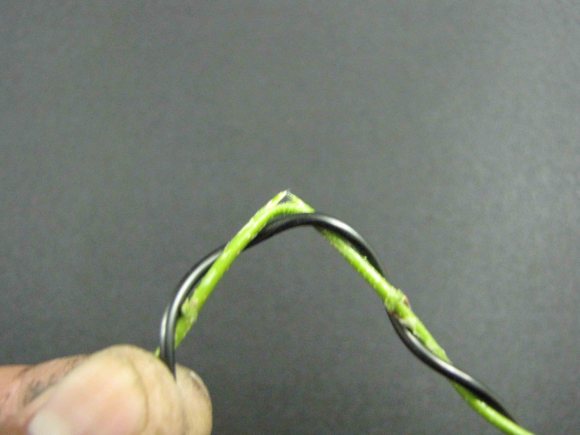 Sorry for the blurry picture but here is an example of the branch breaking when there is no wire support on the outside of the bend (we’ve all done it). Sometimes all it takes for the branch to break is to bend it slightly off the support of the wire. Though new Trident Maple branches can be flexible, the older ones can be more difficult to bend. Branches on flowering plums are known to break easily if the bends aren’t supported by the wire.
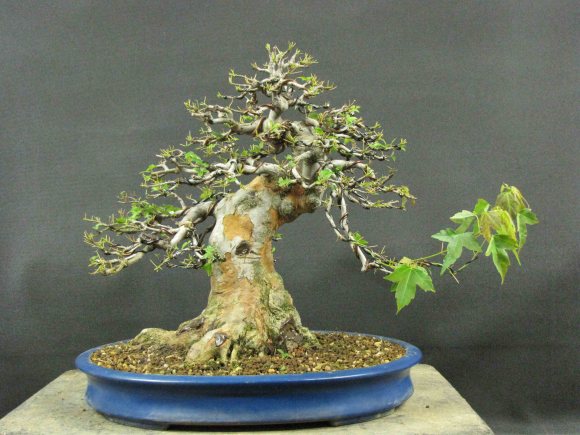 Here is the tree after I wired some of the branches. I wired the branches that were either too close to each other or needed movement. When adding movement to a branch, I made sure to bend them up, down, left, right and everything in between. The tree still has a ways to go but we’re getting there!
Summer Heat
I re-applied sphagnum moss on the soil surface and put the tree back in its spot. There is no need to protect the tree at this point because the Summer hasn’t gotten very hot just yet. If I worked on this tree at the peak of Summer, then I would keep it under shade cloth till the temperature started to fall. Normally, Trident maples can handle a lot of sun and heat. We have Trident Maples in Bonsai pots that sit out in the full Summer sun with no problems at all. The temps in Nagoya during August (hottest month) can reach 104F (40C) with humidity in the 70-80 percent range. The difference is that those out in the hard sun is still in development and tend not to have soft thin ramified branches. All the really refined trees are under 50 percent shade cloth during the Summer. Hopefully in the future, This tree will be good enough to put under shade cloth. ;o) The work for this tree is now finished. I’ll revisit this tree again the next time I work on it.
Bonsai Techniques
When studying Bonsai, the most important lesson to learn is when and when not to use a particular technique. Many times, people will talk about different types of bonsai techniques but forget to mention when it’s actually appropriate to use them. This causes a lot of confusion and undesirable effects to ones trees and often leaves people feeling disappointed.
Some of the most basic concepts in Bonsai can be extremely complex with multiple variables. To quote Boon Mankitivipart, “Basic doesn’t mean easy.” Just because someone pinches or defoliates a Trident Maples doesn’t mean the tree is actually getting any better.
There are three things we need to consider before we use a Bonsai technique:
1. How?
2. Why?
3. When?
If we can reasonably answer these three questions, then we can proceed with the work. If we can’t, then we have to find out either through experimentation or advice from a credible source such as a Bonsai professional.
Defoliating Trident Maples
Has anybody realized that in this post so far, I’ve yet to mention why I defoliated this tree? Well, the reasons are much more than, “because it’s a maple.” Lets talk more about the technique of defoliating and come up with some reasonable explanations of how, why and when we do it.
How? –
Defoliating is the removal of foliage from a tree. Using scissors to cut the leafs off is preferred over pulling because pulling can potentially rip small branches off, which is the opposite of ramifying the branches…
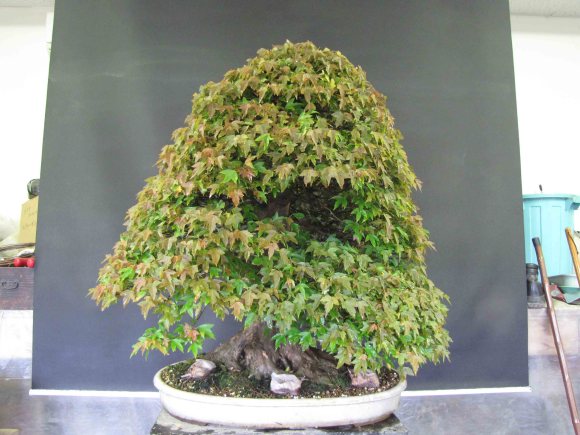 Here is a large Trident Maple now that I defoliated at the beginning of May. The tree has completely leafed out in about one month.
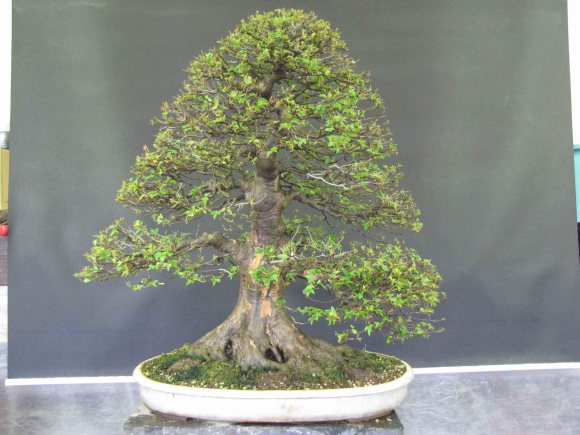 Here is the tree after defoliation in June (second defoliation this year).
Why? –
There are several reasons for defoliating a Trident Maple:
1. Back Budding – after defoliating, a lot of sunlight reaches the interior of the tree and helps promote back budding or strengthening of weak interior branches.
2. Branch Ramification – Though defoliating a Trident Maple doesn’t cause the branches to ramify, the cutting back or pinching of new shoots associated with defoliating creates ramification.
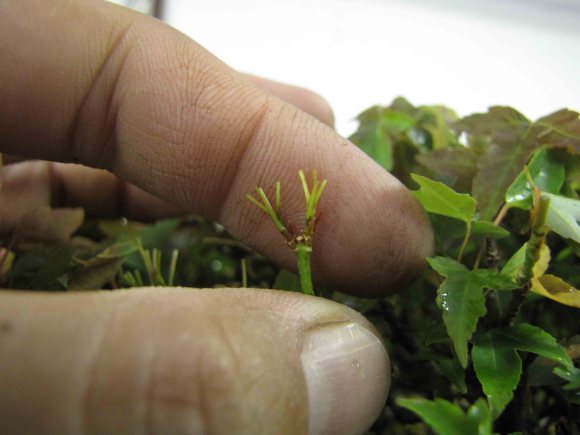 This branch was cut back last May. Because of the cut, these two buds pushed new growth. Today in June, the new leaves were cut off. A month later, each new branch will push out a pair of new branches. We went from one branch to two, then to four. That is how to ramify the exterior branches of the tree.
3. Smaller leaves – New leaves that bud out after defoliation tends to be smaller than the original Spring leaf. This helps in creating a more proportionate looking tree.
4. Slow and control – Defoliating the tree will slow the growth of the tree and makes it easier to control once ramified.
Basically, we can defoliate the tree if it’s for one or all of the reasons above.
When? –
Trident Maples can be defoliated during the growing season (late Spring to early Fall). Usually the first defoliation can be done after the Spring leaves have hardened off. Depending on the local temps, they can be defoliated 1-4 times during the growing season. They grow very well in hot and humid weather. In Nagoya, we can defoliate a Trident Maple up to 4 times. At the beginning of May, June, July, and September.
“When”, isn’t just about time of year, but the health and developmental stage of the tree itself. Just because we have a Trident Maple doesn’t mean it needs to be defoliated. Defoliation is done mainly on more developed bonsai where small foliage and tight branch ramifications are desired. If the tree isn’t at that point yet, then it really shouldn’t be defoliate. An example is the long branches I left on my project tree to thicken the main branch. Of course, if the tree is weak and not pushing new shoots, it’s probably not a good idea to defoliate. At that point, it’s a matter of nursing the tree back to health (shade, water control, light food).
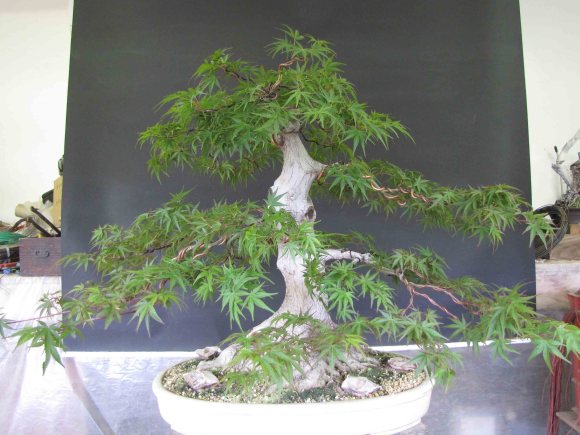 Hence why this Japanese Maple in the last post was not defoliated.
Defoliating Japanese Maple
When it comes to Japanese Maples, the defoliating process a little different. Compared to Trident Maples, Japanese Maples respond a bit slower. Japanese Maples also seem to be much more susceptible to pest problems then Trident Maples as well, so stressing the tree too much during the growing season can make it a target for infestations. Here is a quick look at the defoliating process of Japanese Maples. The Why is the same but the How and When is different. Here is the “How”.
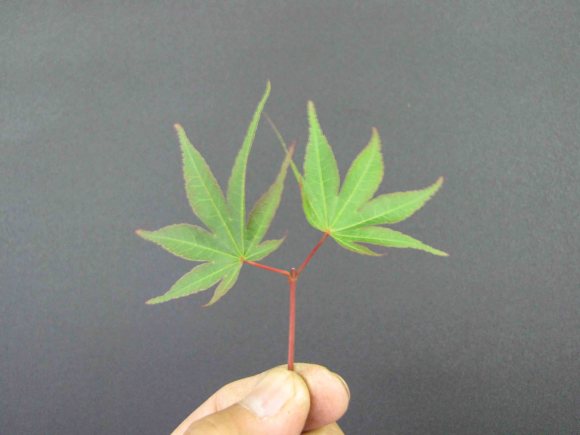 Example of a typical pair of Japanese Maple leaves. Though the center shoot was cut off, just assume that these two leaves are the terminal ends of the branch.
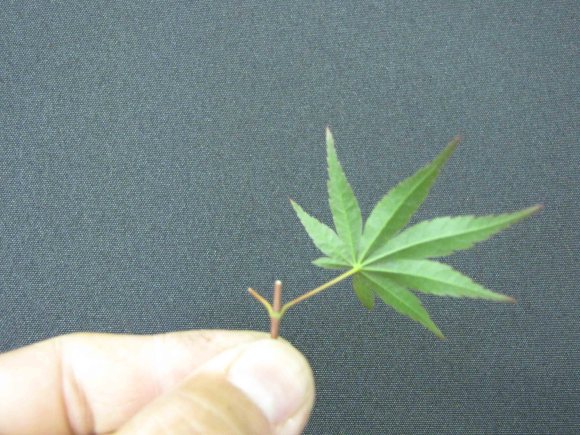 In May we will remove one of the pairs. Usually it’s the strongest (larger) of the two.
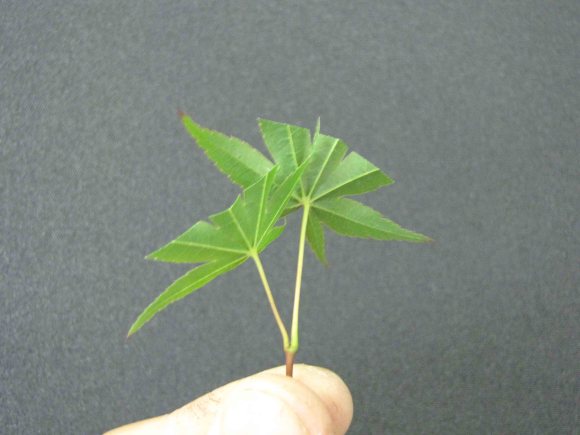 Another technique that can be use though we don’t do it here is to cut both leaves in half.
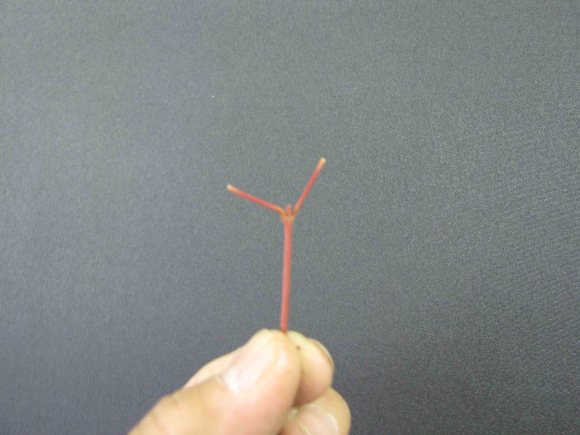 Many time on the exterior of the tree, the leaves or branch may be too vigorous. In those cases, both leaves are removed.
Normally we defoliated Japanese Maples only once a year during May. Trident Maples that were defoliated in May will have fully leafed out by June, whereas Japanese Maples will have just started to push new leaves. If the tree is young and vigorous, we can defoliate a second time but that would be the last.
Japanese Maples are much more sensitive to the hot Summer sun so we protected them under 50 percent shade cloth during Summer. Other than that, the basic cut back techniques are similar to those of Trident Maples. Japanese Maples don’t ramify as easily as Trident Maples so many times, they have a much more open and airy look. This seems appropriate since the trees have a soft feeling to them. Tridents on the other hand tend to have a stronger feeling to them so they tend to have many more ramified branches.
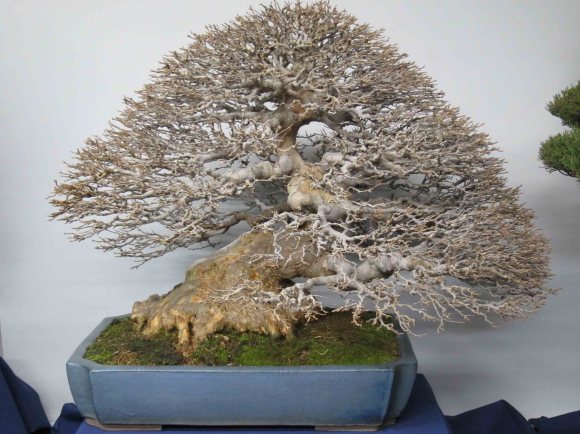 This Trident Maple was created at Aichien and sold about 16 years ago. The tree looks pretty much the same now as it did then. This tree has won the Kokufu prize and was for sale at the Green Club at this year’s Kokufu Show. Note the dense branches and muscular feel of the tree.
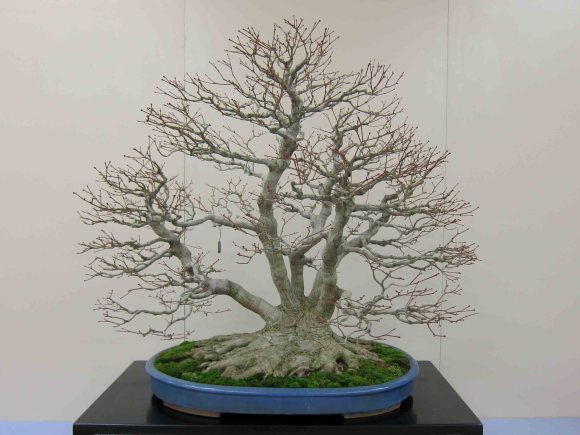 This Japanese Maple was in the Kokufu Show this year. I don’t know who owns it but it’s an, “Important Bonsai Masterpiece.” Note how the tree has a softer feeling and a more open branch structure.
Summary
So let review! Summer is the time to work on deciduous trees, which includes wiring, cutting and defoliate but not always done exactly the same on every tree. We should take the time to ask ourselves how a technique is performed, why it’s performed, and when. Though we may understand a technique, lets always keep our eyes and ears open to new ideas and ways of improving them.
Now if you have some Trident or Japanese Maples at home, take a look at them and see if they should be wired, defoliated or cut back. Give it a try and see what the results are for you. Doing Bonsai it is much more valuable and fun then reading about it. Though I do appreciate that you are reading this post. :o)
Thanks for reading and have some fun creating!
P.S. If you are actively reading this blog, I would appreciate it if you subscribe to it (right column of the blog). This is one of the best ways for me to know how many people are reading. Thanks!
*Your Support*
If you are happy with the contents of this site and would like to show support, please click here or the, “Your Support,” tab in the menu for more information on how you can help me maintain this site and my apprenticeship. Thanks!

Peter, Thanks alot man! Shortly after reading the last post I tried the technique you shared about making a new branch where you’d like. Instead I used a long branch to form a new apex on a trident of mine. Wish me luck! Once again thanks for all the valuable info you provide. Keep em coming
Just WOW! Its great to see all the stuff we were taught and then forgot!! Thanks for the reminders great post Peter. How much was the big ass maple for sale? That is an amazing tree.
Dear Peter I really enjoyed your article on trident maples as seeing the photos and it seemed to make more sense than reading many articles on defoliation as I have 4 young trees that I will start training within the next year or two. Would you mind if I asked you what would be a good feeding routine for young trident maples. Thanks very much keep up the good and interesting updates.
Tony
Hi Pat,
Thanks for reading the blog!
Fertilizing is important in developing Trident and is one thing I didn’t talk about much in the post (which I should have).
Your goal with the tree will dictate how you fertilize Tridents. If you’re trying to fatten the trunk, use heavier fertilizer and let the tree really blow out. If you’re developing more of the main branches then scale back the feeding to something lighter, such as 10-10-10 or so. Once you’re moving into developing smaller branching then go with even less such as 5-5-5.
It seems that feeding a little everyday is much better then one massive dose at a time. If you can develop a system where the tree gets a steady flow of feed daily, that is the best.
For developing trees, you can start feeding at the beginning of Spring. Don’t worry about big leaf sizes at that point. Keep feeding till Winter.
For more refined trees, wait till the Spring leaves have harden off before put on light fertilizer for the rest of the year.
I like using tea bags with organic fertilizer in them. Depending on the size of the tree, start with a 2 bags and add one or every 2 weeks or so to steadily feed the tree.
I hope this helps Pat! Take care!
Very helpful article, Peter. I’ve been growing a few dozen maples from seedling; this info will be quite valuable down the road. Photos were well taken and accentuate the points you make. Thank you.
Peter:
I will reread this one for sure………….but 1 short question about Japanese Maple not at the refinement stage.
Tree is large…over 2′-0″…..with 2″ trunk …..20+ years old and some basic but, poorly organized branching which need “Re-development”.
Assuming a healthy and vigorous tree…….which I am letting grow unpruned to make branches and trunk larger [Mekake]…….and cutting back only in the fall…….is late fall the optimal time for structural pruning and wire the basic primary and secondary branches?
Please excuse………
I have the feeling I just asked one of those questions at a party like………” So Doctor, when removing the heart and transplanting another, where do you make the first cut?” Naive and stupid I know.
Any guidance appreciated.
D/D
Chicago
Hi Daniel,
No worries man! The question you have is a good a valet one!
The best time to do the structural work on Japanese Maples is during the Summer. Early Summer is best because it will still be relatively cool during that time. Once the Spring leaves have hardened off is when you can start the work. If the work is done during the really hot times, then shade cloth is a must afterwards. The reason why Summer is the best time is because the tree is in growing mode. Callus will form well and quickly after large cuts are made. Wired branches will grow and hold it’s new bends and position. Just be sure to check the wire and remove the ones that start to bite in. Since the tree is allowed to run, the wire will start to bite in within a month. More refined trees, the wire can stay till the beginning of the following Spring. If there are any breaks or cracks when wiring the branches, the growing season is more forgiving as well. Removing wire is best done right before Spring, unless it’s already been removed during the Summer. If wire is removed during the Winter and there is an accidental break, the tree can start to bleed sap. I’ve seen some Japanese maples that were cut too late in the Fall and will leak sap for weeks!
*Note on wiring*
If you plan on wiring the tree, be sure to wire most of the tree so that the entire tree is stressed. If only the weak parts are wired and the strong areas are left alone, the tree may decided to focus it’s energy on the least stressed branches and cut off support to the stressed branches. In that case, you will start to loose branches (Usually the important ones it seems. LOL). Of course, only strong trees should be wired anyways.
The reason why late Fall is not a good time is because the tree is no longer growing so everything that gets cut or wired won’t really do anything. Callus will grow slow and won’t start to move quickly till the following Spring. Branches that are wired won’t hold it’s bends because the tree isn’t growing new wood to hold it’s position. Any cracks that occur during the wiring process will tend to kill the branch as well. Also, having wire on a deciduous tree during the following Spring growing season can be dangerous because once the Spring starts, the wire will start to bite in within weeks. The last but most important part is that cutting in late Fall, if there is a short warm spell, new leaves may try to push on the tree just to freeze and fall off when the cold returns. That in itself will stress the tree big time and will slow the strong Spring push.
Hahaha, I can’t seem to give you quick answers to your questions Daniel! I hope this helps and again, your question is a good one and I believe others that are reading this will benefit from it as well. Thanks and take care!
Wow, this post contains more information about defoliation than any books I own, and I own many.
You should think about publishing a book.
Thank you very much for your advices, I will follow them.
[…] Trident Maple Project and Summer Maple Work Rate this:Share this:Like this:LikeBe the first to like this. By bonsai eejit • Posted in Bonsai Blogs • Tagged blogging, bonsai, eejit, Peter Tea 0 […]
Thanks Peter for all the great info…I really appreciate all the time and pictures you post. I tend to be a visual person as sometimes when you read instructions, they don’t always make sense ( to me at least). I have a question regarding red maples. Can these techniques be done on them? My red maple has extremely long nodes and I don’t seem much back budding, so I’m hesitant to be too aggressive. Also on a green Japanese maple, like to one in your post, mine have leaves’ stems all skewed. Some have ninety degree bends with one leaf facing out and the other will bend back to the trunk. Not sure if that makes sense.
Thanks again. I’ve learned so much from your posts. Keep up the great work!
Hi Snady789,
I too am a visual person, which is probably why I put so many pictures on the post! LOL.
Red maples can be defoliated now as well. I would go through the tree and remove one leaf from the leaf pair. This will allow light to get into the interior to keep small branches strong and promote back budding. If your Summers are hot, it is a good idea to protect the tree under some shade cloth. In about a month or so, you should see some new buds pushing and hopefully some back budding.
As for the curly leaves, I’m familiar with that and have seen it on japanese Maple as well. It almost seems like the leaves are growing upside down because of the curling. I don’t know what causes this condition, but I’ve been told that when the tree is stressed, it has a tendency to do that. Also, it seems that only some tridents are prone to that happening whereas it never happens on other tridents. Has it always done this? and if so, it might just be a characteristics of that tree. If it didn’t do that in the past, I would let the tree grow out for a bit, water it well and feed it lightly. Hopefully the new growth will start to come out normal.
I’ll do more research about the bent leave stem (petiole) and share what I find in the future.
Thanks for the comments and questions! Take care
[…] National Bonsai and Penjing Museum, and the second, which is about defoliation (and more), is at Peter Tea Bonsai. Peter is in […]
Thanks Peter for a well structured and informative post as always ,I am learning a lot from reading your posts …keep them coming
Cheers
Barry
Very informative post Peter, thank you.
Thank you Peter for the timely post. It is mid-June here in Southeastern Pennsylvania, and thoughts of Trident and Japanese Maple defoliation and pruning are running through my head. I will keep your comments in mind.
Thanks Barry! It’s Mid-June here in Japan as well! Hahaha ;op I hope this post is able to help. Take care!
work, work, work: I´m just going to put hands on, to practice what I´ve learned. Peter, the pots seems small for the tress live mass: how many times/day had you watered then lately? thanks for the detailed descriptions.
Hi Marcelo,
Yes, the trees do go in pretty small pots, but not too small it seems. The trees seems to be growing just fine and it’s pretty much the norm here. LOL
Right now, we water all the trees once a day (assuming it’s not raining) and the deciduous trees twice a day. Once we get deep into the Summer such as July and August, we’ll add an extra watering in to make it twice a day for everything and a third time for the deciduous.
Thanks and take care!
Dear Peter, Thanks for the info. You answered all my questions about defoilating. Ed Curled.
All your posts are so informative. This one is no exception. I read them all.
Peter, I hope you are keeping all these writings for perhaps a book later. Question, do you take the leaves off a trident if it has been repotted this year. Penny
That is a great questions Penny! Yes, Tridents that have been repotted this year can still be defoliated, assuming that it grew well during the early Spring.
Thanks and take care!
Peter –Thank you for your sharing your knowledge !! I think my skills & in particular my deciduous trees have started to improve & I am now more confidant in pushing the development finer branching in the maples & elms …
May I impose on you or the masters knowledge for a short explanation of a technique I saw in china I have 4 pix that may help ,but don’t know how to send then to you on this site –The first smallest example I saw was in Chengdu-s flower/plant/bonsai market — it’s roots { 2ft by 3 ft } appeared to have been developed in a rather straight { 1&1/2 inch } crevice ,,the effect was like a very see through ,extensively carved wooden screen — Later in LiJiang Buddhist Temple I saw a much thicker example displayed in the public garden ,the exposed “root ” was aprox 3 ft wide 2 ft high & with a very flattened 6inch thickness ,again with many holes { like the Scholars & Garden Stones the Chinese like so much} ,,then later a massive one,” in ground ” developing one 4 ft high by 6 ft wide around 8 inch thick — Nothing showing above ground as to the technique but the watering ” ring ” was very close to the tree considering its size —the smallest still had “a skin ” on its root surfaces –but the bigger ones did not seem to … I intend on using up some extra short, thick ,no taper Tridents from the Santa Cruz Raffle table by planting them as close as they will go in a long ,narrow tall-ish container ,,,please any thoughts you may have are welcome ,,, I am a officer & student in 2 clubs taught by Mr. Kinoshita in addition to the Santa Cruz club Sincerely & again Thank You Tim Shea
Hi Tim,
Thanks for the comments. Why don’t you send me those photos through my email instead so I can take a look at them. Peter@PeterTeaBonsai.com.
Thanks!
Great post Peter. This helps tie things together and will be of much use now and in the future. Thank you for sharing all this information with us back home.
Jeff
This made me laugh,
“I believe that the callus grew fast because it didn’t have to worry about drying out and exposure to the elements. What do you think?”
I doubt that the callus’ level of anxiety had much to do with it. But anyway, as always a really good post. Interesting, well-written, and educational. Good job Peter!
Awesome Post Peter. As always, informative, logical, and a pleasure to read.
I did have a question though. Do these techniques differ at all for some of the Kaede varieties? I have several Miyasama Kaede that I’ve been hesitant to defoliate along with my regular Tridents.
Thanks, and keep up the great work!
(p.s. you and Jonas must be truly sympatico…every time I open my email to find one of you has a new post, the other does as well!)
Hi Japanpots!
Defoliating Miyasama Tridents is perfectly fine. The main difference on those is that cut don’t tend to heal as fast as the typical trident maples, They also don’t seem to grow as vigorous as a regular trident maples as well, though it still does put out some long shoots.
Try defoliating the tree and see how the tree responses. If new leaves comes out and shoots start to extend aggressively, then defoliating it more then once should be okay. Last year, I defoliated a large one but it was later in the Summer so I only did it once.
Thanks for the comment and take care!
Thanks Peter ! I hope your starting to write a book ! The information you give for people to learn is a great ! Enjoy the summer .
Peter, I really like the way you stress that you should do what the tree needs rather than because it’s the season. As usual your post is informative and appreciated.
Peter,
As always-very much enjoy reading your informative posts. You have a real knack for breaking it down into logical, stepwise bites!
Thanks
Great stuff Peter. Your post are an inspiration.